
ARCHITECTURAL DRAWING & GRAPHICS-II UNIT II

AR203
ARCHITECTURAL DRAWING & GRAPHICS-II
UNIT II
ONE-POINT PERSPECTIVE
Blocks, Furniture and Interior Spaces
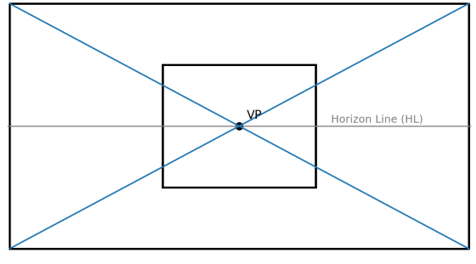
Raceding lines converge to one vinaching point
Concept diagram: one principal depth direction converges to a single Vanishing Point. B.Arch. II Year / III Semester | Session 2026-27
Unit II Overview
Prescribed Syllabus |
This chapter is organised around the prescribed Unit-II syllabus and the supplied Architectural Drawing & Graphics-II exercise booklet. Exercises 01-04, 09, 10 and 11 are integrated where they support the learning sequence. Exercises 05-08 are not treated as core one-point-perspective exercises here because their principal horizontal edges are inclined to the Picture Plane; they are more appropriate for two-point perspective and should be taken up in Unit III.
The supplied exercise booklet does not contain a separate dimensioned furniture-construction exercise. Therefore, the furniture exercises in Section 2.7 are supplementary syllabus-aligned practice added to cover the syllabus requirement. They are clearly identified as such.
Learning Objectives
- Understand the geometric condition that produces one-point perspective.
- Construct one-point perspectives of basic points, lines, planes and simple solids.
- Develop perspectives of simple and composite blocks using a single principal Vanishing Point.
- Apply the bounding-box method to simple household furniture.
- Construct one-point interior views with openings, flooring, furniture and scale references.
- Use line weight, tone and basic rendering to improve architectural presentation.
Exercise-to-Syllabus Alignment
Study-note section | Syllabus component | Exercise-book alignment |
2.4 Preparatory Perspective Exercises | Foundation / bridge from Unit I | Exercises 01-03: Point, Line, Square Lamina |
2.5 Simple Block | Simple blocks | Exercise 04: Square Prism |
2.6 Complex / Composite Block | Complex blocks | Exercise 09: Square Prism + Square Pyramid |
2.7 Household Furniture | Furniture items | Supplementary F1-F3 (added for syllabus coverage) |
2.8 Basic Interior Perspective | Interior views | Exercise 10: House Interior |
2.9 Furnished Interior Perspective | Interior + furniture | Exercise 11: House Interior |
Reserved for Unit III | Two-point perspective | Exercises 05-08 |
2.1 Introduction to One-Point Perspective
One-point perspective is a perspective system in which one principal set of horizontal lines receding away from the observer converges towards a single Vanishing Point (VP). It is normally used when one principal face of the object is parallel to the Picture Plane (PP), while the depth direction recedes approximately perpendicular to the PP.
This makes one-point perspective particularly suitable for frontal architectural views such as rooms, corridors, galleries, classrooms, entrance halls, roads, railway tracks and furniture placed with a principal face towards the observer.
Core Rule |
Raceding lines converge to one vinaching point
Figure 2.1. Basic visual principle of one-point perspective
2.2 Conditions for One-Point Perspective
Principal direction | Behaviour in one-point perspective |
Vertical edges | Remain vertical |
Horizontal edges parallel to PP | Remain horizontal |
Horizontal edges receding perpendicular to PP | Converge towards one VP |
Frontal plane | Appears without perspective convergence in its own horizontal/vertical edges |
Depth direction | Shows diminution and convergence |
A central Vanishing Point creates a formal and symmetrical composition. An off-centre Vanishing Point can still produce one-point perspective, but the composition appears more dynamic. In both cases the same principal depth direction converges towards the same VP.
2.3 Construction Elements and Working Sequence
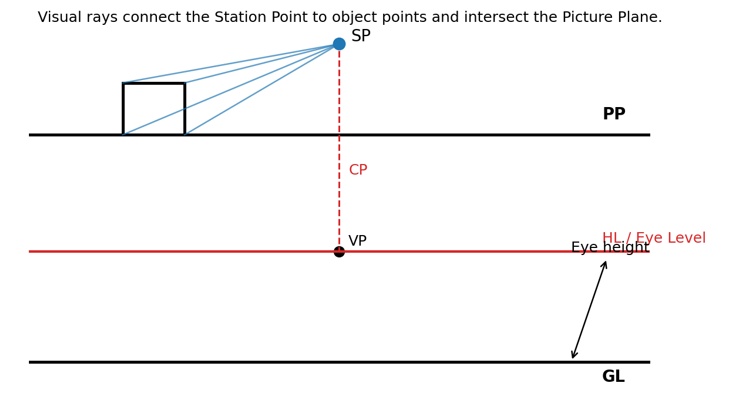
Element | Meaning / use |
Picture Plane (PP) | Imaginary vertical plane on which the perspective image is formed. |
Station Point (SP) | Plan position of the observer. |
Ground Plane (GP) | Horizontal reference plane on which the object rests. |
Ground Line (GL) | Intersection of the Picture Plane and Ground Plane. |
Horizon Line (HL) | Represents the observer’s eye level. |
Central Plane (CP) | Vertical plane through SP, generally perpendicular to PP. |
Vanishing Point (VP) | Point on HL towards which the principal receding horizontal lines converge. |
Visual Rays | Lines joining SP to important object points; used to locate perspective positions. |
Standard Construction Sequence
- 1. Draw the Picture Plane and place the plan of the object in the required relation to PP.
- 2. Locate the Station Point and Central Plane.
- 3. Draw visual rays from SP to the important plan corners and mark their piercing points on PP.
- 4. Establish the Ground Line and Horizon Line according to the eye height.
- 5. Locate the Vanishing Point on HL.
- 6. Project the PP piercing points into the perspective field.
- 7. Construct frontal edges and draw receding lines towards VP.
- 8. Transfer heights from a suitable true-height/reference vertical.
- 9. Complete rear/secondary surfaces, openings and subdivisions.
- 10. Retain construction lines lightly and darken only the final visible edges.
Memory Sequence |
2.4 Preparatory Perspective Exercises: Point → Line → Plane
The exercise booklet begins with three fundamental problems before moving to solids. These are best understood as bridge exercises between Unit I and Unit II. They establish the projection logic that will later be used for blocks, furniture and interiors.
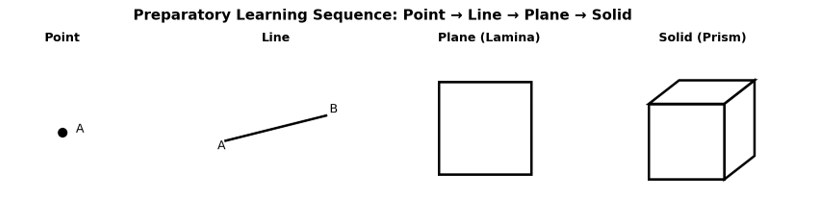
Exercise 01 – Perspective of a Point
Exercise-book problem |
Learning focus: locating a single perspective point through plan position, eye height, Station Point and visual-ray projection.
Exercise 02 – Perspective of a Straight Line
Exercise-book problem |
Learning focus: project the two end points independently, then join their perspective positions. The exercise shows how apparent length changes with orientation and distance.
Exercise 03 – Perspective of a Square Lamina
Exercise-book problem |
Learning focus: move from separate points and lines to a complete plane surface. Locate all corners through visual rays and preserve the correct edge connectivity in the final perspective.
2.5 Perspective of Simple Blocks
The square prism is the first major one-point-perspective solid in the exercise booklet because one rectangular face is parallel to the Picture Plane. This condition gives a clear frontal face while the depth edges recede to a single VP.
Exercise 04 – Square Prism (Core One-Point Problem)
Exercise-book problem |
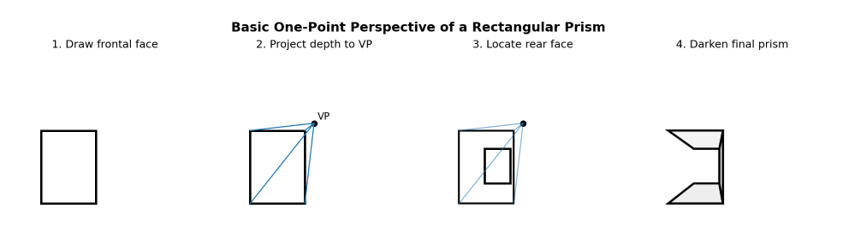
Worked Construction Logic
- 11. Draw PP and the 40 mm × 40 mm plan of the prism with one rectangular face parallel to PP and 10 mm behind it.
- 12. Locate the centre of the prism in plan and position the Central Plane 45 mm to the right of that centre as stated in the problem.
- 13. Locate SP 30 mm in front of PP. Draw visual rays from SP to all four plan corners and note their intersections with PP.
- 14. Draw GL and place HL 80 mm above GL to represent the observer’s eye level.
- 15. Locate the one principal VP on HL along the central viewing direction.
- 16. Project the PP piercing points vertically into the perspective field. Construct the front vertical face first.
- 17. From the four corners of the frontal face draw the depth edges towards VP.
- 18. Use the plan-derived projectors to locate the rear face; do not guess or directly measure 19. perspective depth.
- 19. Join the corresponding rear vertical/horizontal edges and darken the visible outline.
|
Important |
2.6 Perspective of Complex / Composite Blocks
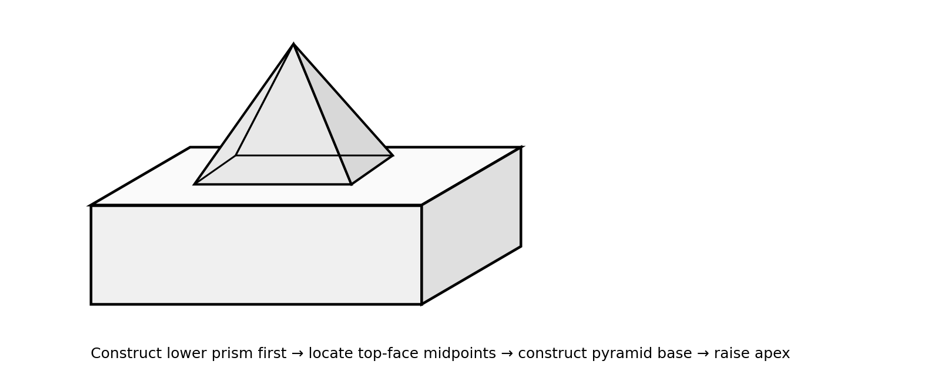
Complex forms should be simplified into basic volumes. Construct the primary block first, establish reliable subdivisions on its visible surfaces, and then add the secondary solid. This avoids trying to draw the final complex form all at once.
Exercise 09 – Square Prism with Square Pyramid
|
Exercise-book problem |
Construction Strategy
- 20. Construct the square prism accurately in one-point perspective.
- 21. On the top face, locate the midpoints of the four edges using diagonals or appropriate projective subdivisions.
- 22. Join the midpoints to obtain the square base of the pyramid on the prism top.
- 23. Locate the centre of this square; this is the plan position of the pyramid axis.
- 24. Raise the apex 30 mm above the top of the prism using a true-height/reference vertical and projection method.
- 25. Join the apex to all four base corners of the pyramid.
- 26. Remove or lighten hidden construction lines and strengthen the visible edges.
|
Design Lesson |
2.7 Perspectives of Simple Household Furniture
The Unit-II syllabus specifically requires perspectives of simple household furniture items. The supplied exercise booklet does not provide a separate dimensioned furniture problem, so the following exercises are supplementary syllabus-aligned practice.20.
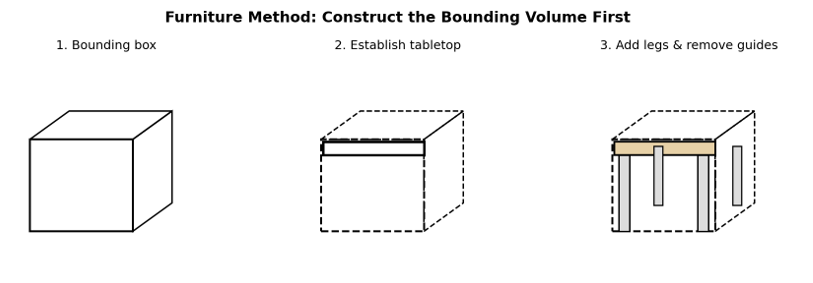
Figure 2.6. Recommended furniture method: construct an overall bounding volume first.
Furniture Exercise F1 – Study Table (Supplementary)
|
Given |
- 27. Construct the overall bounding box in one-point perspective.
- 28. Mark the tabletop level and thickness.
- 29. Locate the four leg positions in plan or on the top/bottom reference surfaces.
- 30. Drop verticals for the legs and complete their rectangular sections.
- 31. Remove the unnecessary bounding-box guides and strengthen visible edges.
Furniture Exercise F2 – Single Bed (Supplementary)
|
Given |
Use the same bounding-box principle. Establish the bed platform/mattress first, then the headboard. Add a side table only after the main volume is stable.
Furniture Exercise F3 – Wardrobe / Cabinet (Supplementary)
|
Given |
The wardrobe is useful for practising tall vertical proportions, door divisions and shallow depth. Keep all verticals vertical, frontal horizontals horizontal and receding cabinet depth lines directed towards VP.
2.8 One-Point Interior Perspective – Basic House Interior
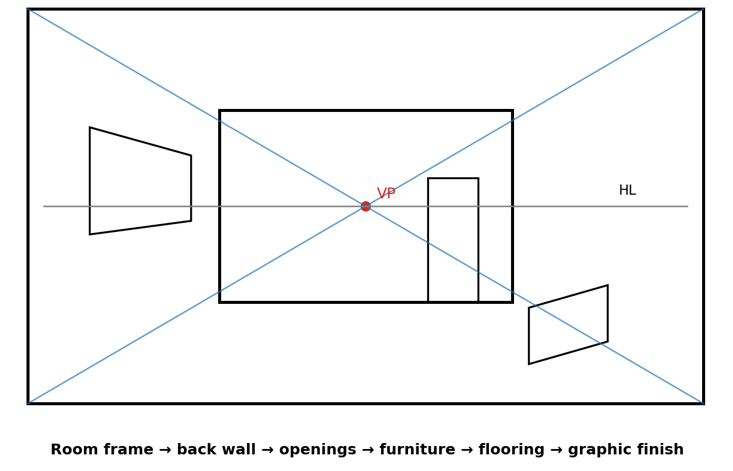
Interior perspective is the principal architectural application of this unit. A room is treated as a large rectangular volume containing a floor, ceiling, side walls and back wall. Receding floor, ceiling and side-wall edges converge towards the same VP.
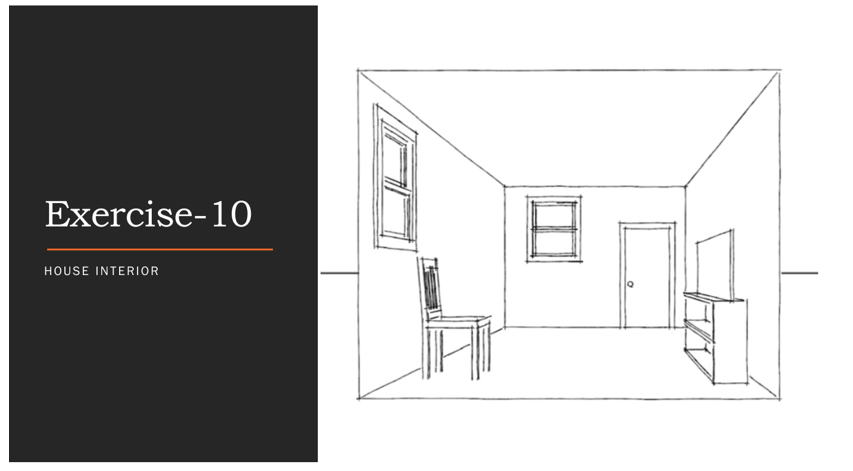
Exercise 10 – House Interior
Exercise 10 in the supplied booklet is titled “HOUSE INTERIOR” and shows a room with a side-wall window, a back-wall window and door, a chair/table arrangement and a cabinet/TV unit. Use it as the first full interior exercise.
Recommended Construction Sequence
- 32. Draw the room plan and identify the Picture Plane and viewing direction.
- 33. Locate SP and the single VP; establish GL and HL at the required eye height.
- 34. Construct the frontal room frame and draw floor/ceiling/wall receding lines towards VP.
- 35. Locate the back wall by plan projection rather than by visual guesswork.
- 36. Project door and window positions from plan; transfer sill, lintel and door heights from elevation/reference verticals.
- 37. onstruct the larger furniture pieces using bounding boxes.
- 38. dd smaller items only after the major geometry is correct.
- 39. Introduce a floor grid or simple material divisions to reinforce depth.
- 40. Apply line weight and light rendering, keeping the architectural space dominant.
2.9 Furnished Interior Perspective – Advanced Application
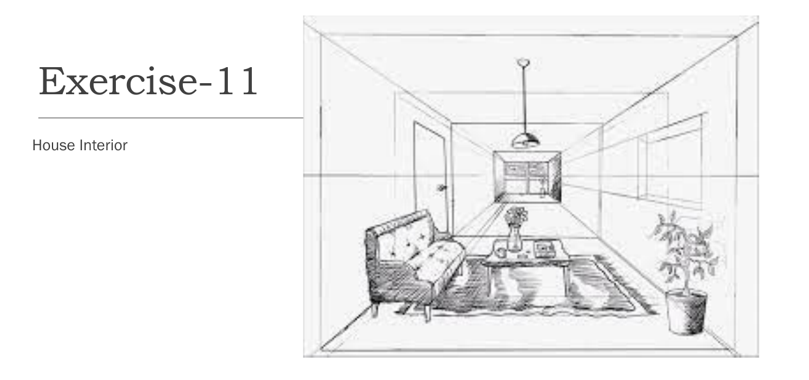
Exercise 11 – House Interior
Exercise 11 develops the interior further through a furnished living-space reference. It is appropriate as the advanced Unit-II exercise because it requires the student to coordinate the room envelope, openings, furniture, ceiling element, floor treatment and decorative accessories within one consistent perspective system.
Construction Priorities
- Room geometry must be correct before furniture is added.
- Large furniture should be built from simple bounding boxes.
- Repeated floor or ceiling lines must show progressive compression.
- All receding edges that belong to the principal depth direction must converge to the same VP.
- Accessories and rendering should support scale and depth, not conceal construction errors.
2.10 Doors, Windows and Openings
Openings on the side walls require particular care. Their vertical jambs remain vertical, while sill and head lines that recede along the wall follow the same VP as the wall. Accurate positions should be obtained from plan projection; widths should not be guessed directly on the receding wall.
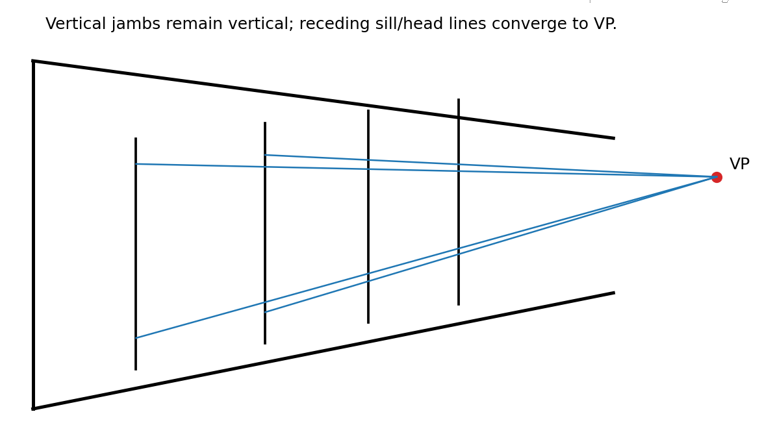
- 41. Locate the opening in plan.
- 42. Project its plan limits through SP to PP.
- 43. Transfer those positions into the perspective field.
- 44. Mark sill, lintel and door-head heights from a reference vertical/elevation.
- 45. Complete receding horizontal lines towards VP.
2.11 Flooring and Repetitive Elements
Floor tiles, ceiling panels, wall modules and other repetitive elements are excellent devices for demonstrating depth. Equal real-world intervals cannot be drawn as equal perspective intervals. Their apparent spacing becomes progressively smaller with distance.
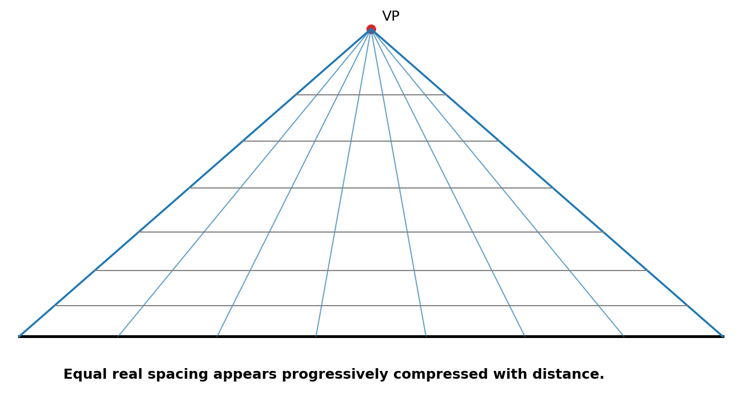
Key Principle |
2.12 Human Figures, Accessories and Scale
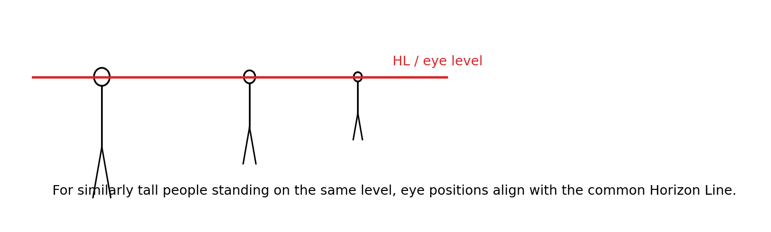
People, furniture and familiar accessories provide immediate scale references. If similarly tall people stand on the same horizontal ground plane, their eye positions should align with the common Horizon Line when the drawing is constructed consistently.
Plants, paintings, lamps and other accessories should be added only after the principal architecture and furniture are correct. Their role is to communicate use, scale and atmosphere.
2.13 Rendering and Graphic Presentation
Graphic element | Recommended treatment |
Primary foreground edges | Heavier line |
Secondary object edges | Medium line |
Distant details | Light line |
Construction/projection lines | Very light line |
Surfaces/materials | Controlled tone or texture |
Shadows | Use consistently to reinforce volume and depth |
A successful perspective drawing combines geometric accuracy with graphic clarity. Rendering should never be used to hide incorrect construction.
2.14 Common Errors in One-Point Perspective
Common error | Correction |
Using different VPs for the same depth direction | All principal depth lines must converge to one common VP. |
Drawing receding lines parallel | Receding lines must visually converge towards VP. |
Directly measuring equal intervals on depth lines | Use projection, diagonals, grid or measuring methods. |
Tilting verticals | Vertical edges remain vertical in standard one-point perspective. |
Guessing door/window positions | Locate openings from plan and transfer heights from elevation/reference lines. |
Adding furniture before room geometry is stable | Construct room envelope first, then bounding boxes for furniture. |
Over-dark construction lines | Keep guides light; strengthen only the final visible drawing. |
2.15 Exercises Reserved for Unit III
The following exercise-book problems are intentionally not treated as core Unit-II problems because their principal horizontal edges are inclined to PP, producing two horizontal receding directions. They should be studied with Unit III – Two-Point Perspective.
Exercise | Reason for Unit-III placement |
05 – Rectangular prism | Longer base edge inclined 45° to PP. |
06 – Square pyramid | Base edges equally inclined to PP. |
07 – Model of steps | Longer edge inclined 30° to PP. |
08 – Shed | Horizontal long edges inclined 45° to PP. |
2.16 Quick Revision
One-Point Perspective at a Glance |
Review Questions
- 46. Define one-point perspective and state the geometric condition under which it is used.
- 47. Explain the relationship between Picture Plane, Station Point, Horizon Line and Vanishing Point.
- 48. Why should perspective depth not be measured directly on receding lines?
- 49. Describe the construction sequence for a simple square prism in one-point perspective.
- 50. Explain the bounding-box method for furniture perspective.
- 51. How are doors and windows located accurately on a receding side wall?
- 52. Why do equal floor-tile intervals appear progressively smaller with distance?
- 53. Describe the correct sequence for constructing a furnished room interior.
Short MCQ Revision
Question | Answer |
In one-point perspective, how many principal depth VPs are used? | One |
Where is the VP located? | On the Horizon Line |
What does HL represent? | Observer’s eye level |
How do standard vertical edges behave? | They remain vertical |
What should be constructed first for a table or bed? | An overall bounding box |
Do equal real intervals remain equal in perspective depth? | No; they compress with distance |
Suggested Submission / Practice Sheet Sequence
Sheet | Exercise | Purpose |
1 | Exercises 01-03 | Point, line and plane projection fundamentals |
2 | Exercise 04 | Simple one-point square prism |
3 | Exercise 09 | Composite solid: prism + pyramid |
4 | Furniture F1-F3 | Table, bed and wardrobe using bounding boxes |
5 | Exercise 10 | Basic house interior |
6 | Exercise 11 | Advanced furnished interior with graphic presentation |
End of Unit II
How useful was this post?
Click on a star to rate it!
Average rating 0 / 5. Vote count: 0
No votes so far! Be the first to rate this post.


